Late Update
I have done a few things since i last updated my blog such as: Unwrapping a 'complex object' as well as a basic object, Using the UVW Modifier, using the material editor to create different maps, such as maps with bump, as well as learning how to tile these map and using multi-sub object, as well as basic maps with things like Dent, Falloff or just adding my own basic texture, and lastly we have learnt about different lighting within the scene and how to use them effectively.
Teapot
For the lighting i just used a Teapot and added different lighting into the scene to show how they are used and what effect they give. Below are pictures of these.
Mapping
Using the material editor we learned about the Bump map and how it's used to add detail that looks 3D using our own created bump map, below is a sphere with a map i created using different maps and textures playing around with them, i first found a water texture on the internet and had to edit it within photoshop to make it so that it tiled and repeated easily without error, after this i applied it to the materials diffuse as a bitmap then added a bump and just used the wave material to make it look a bit more detailed and more like water then finally added a reflection map as a raytrace material to make it glimmer slightly and below is the outcome of the render. |
| Tiled water texture I used. |
Dice/ Multi-sub Object
We also learned of multi-sub object, to demonstrate this i created a basic box and added a different texture to each side to make it look like a dice, and played around with the ID's of the different bitmaps within it so the right numbers were opposite each other such as 5 being on the opposite side of the dice to 2. below is a render of the dice. I tried adding a chamfer to the edges of the box to make it look less sharp but this made the map apply to the chamfered edges as well as on the correct sides themselves, this is easily fixed by changed the ID's of the polygons created by the chamfer to that of the plain materials within the multi-sub object, although i did not do this because it was not really necessary for a basic object.
UVW, Complex & Basic
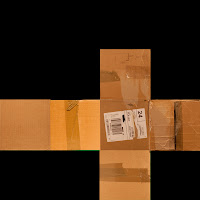
Lastly i learned about UVW Mapping, and applied this to 2 different objects, a simple box shape and a more complex house object with a chimney. Mapping the box was fairly simple as the UV Template was a simple unfolded box but the house however was more complicated as i had to play around with the UVW and re-size the different size to make them all the right ratios to each-other so the texture came out clean and so it was easy to apply within Photoshop, the outcome as well as the templates and the textures applied to the templates for the box and the house are below.


No comments:
Post a Comment